Getting Started with ShopNex ePOS
Welcome to the guide for your ShopNex e Point of Sale (POS) system. This easy-to-follow guide will help you learn how to use your store's system for daily tasks.
What is the ShopNex ePOS System?
The ShopNex ePOS system is like a smart cash register that helps you run your business. It lets you:
- Ring up sales and take payments
- Keep track of what's in your store
- Remember customer information
- See how well your business is doing
What You Need to Use the System
To use the ShopNex ePOS system, you need:
- A computer, tablet, or phone with internet
- An up-to-date web browser (like Chrome, Firefox, Safari, or Edge)
- Your username and password
How to Log In
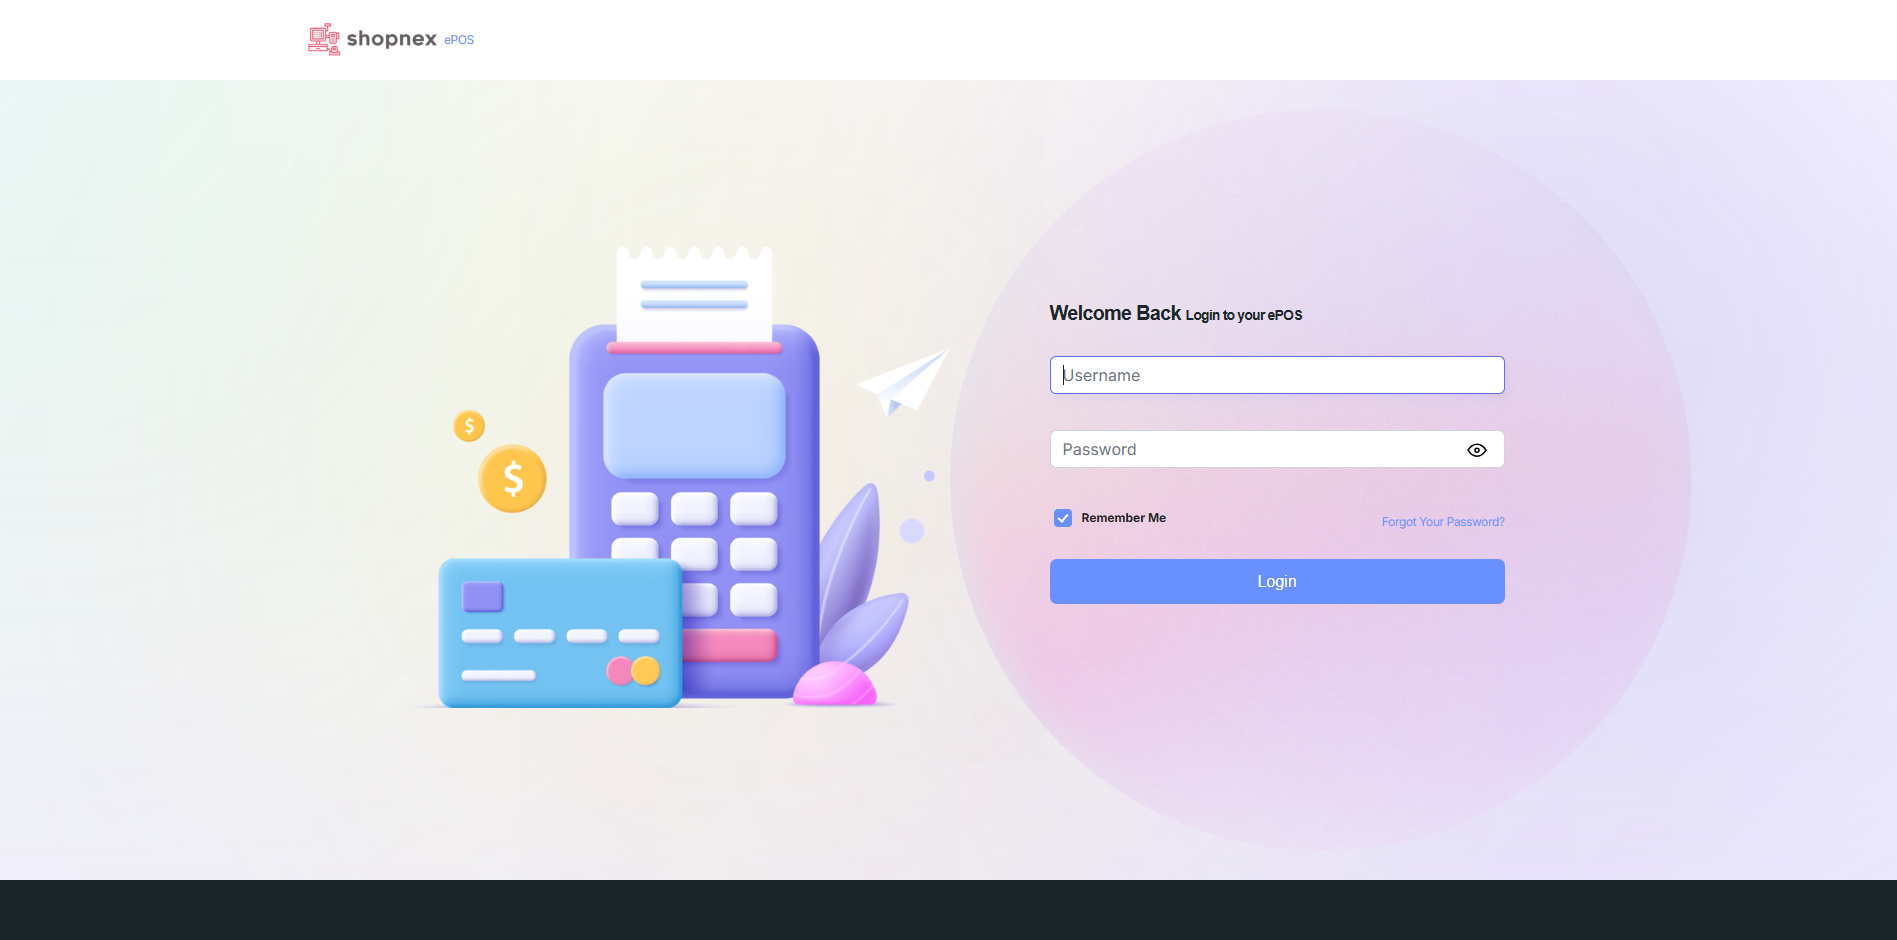
The login screen where you enter your username and password
To start using the system:
- Open your web browser (like Chrome or Firefox)
- Type https://your-sn-id.ed5.in/ in the address bar at the top
- Enter your username in the first box
- Enter your password in the second box
- Click the "Login" button
Forgot your password? No problem! Just click on "Forgot Password" and follow the steps to get a new one.
Understanding Your Home Screen (Dashboard)
After you log in, you'll see the main home screen (dashboard) which gives you a quick overview of your business.
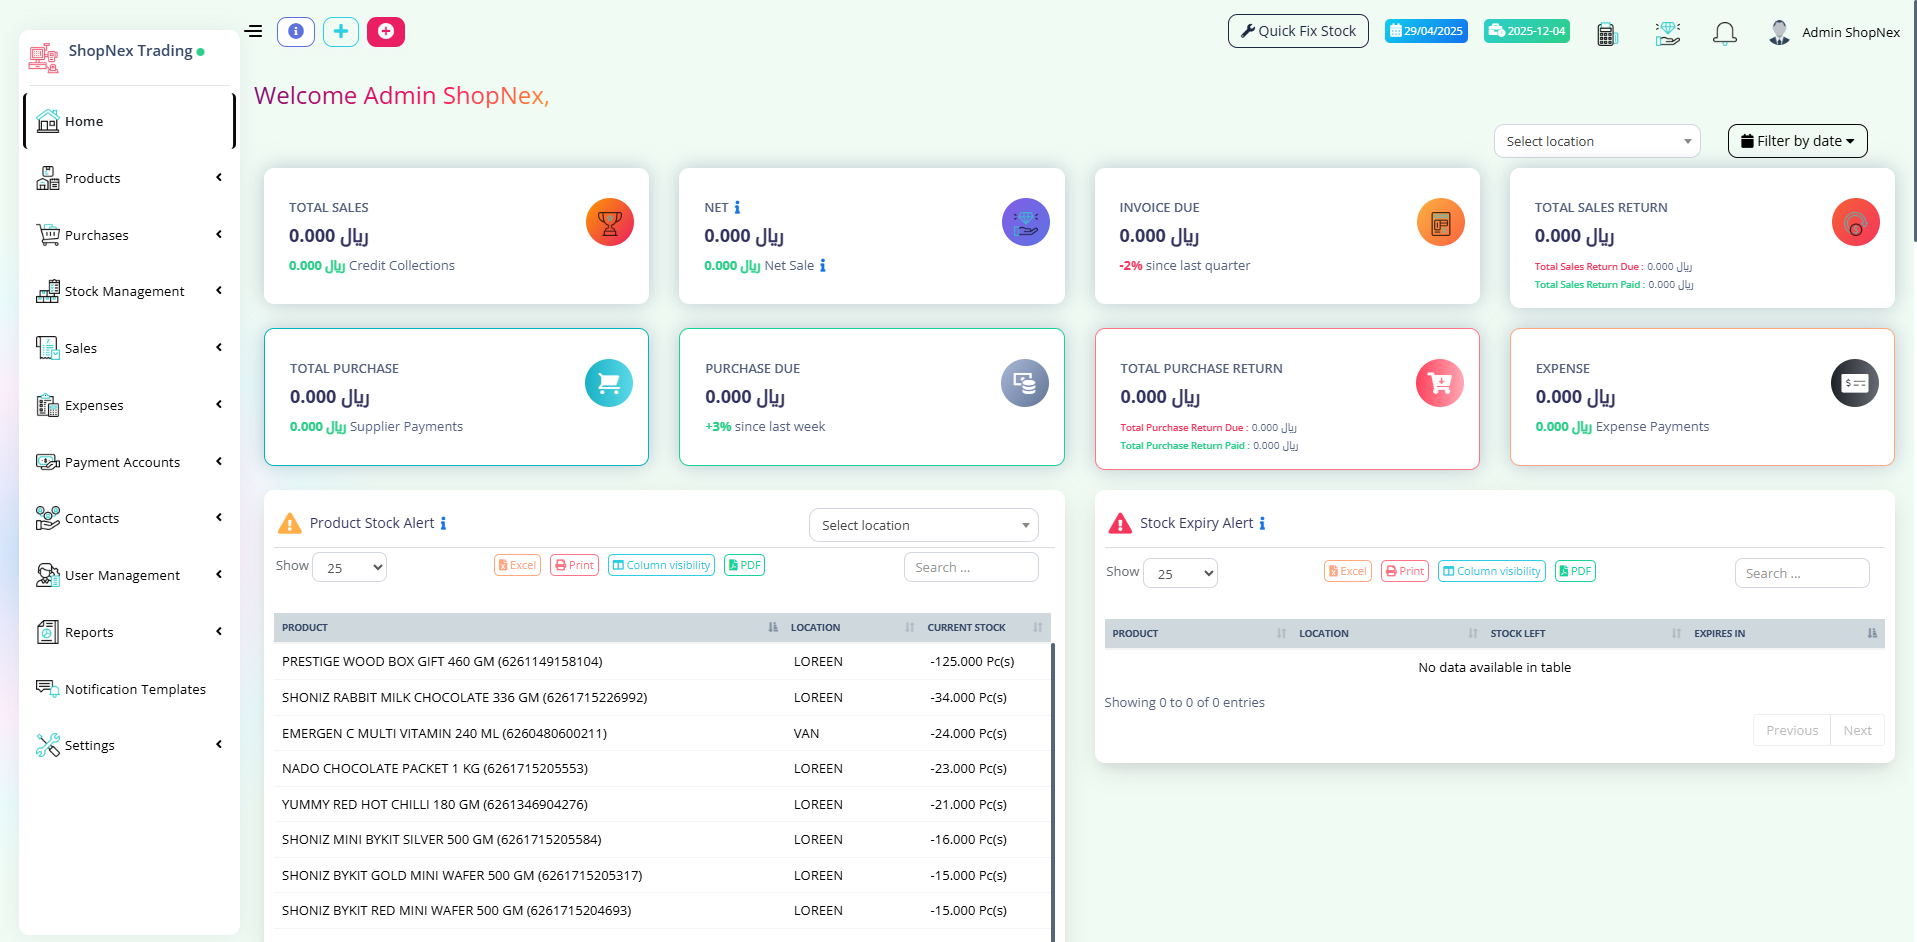
The home screen (dashboard) shows important information at a glance
What You'll See on the Dashboard
The dashboard is divided into several sections that give you important information:
1. Left Menu (Navigation)
On the left side of the screen is the main menu with buttons for:
- Home - Returns to this dashboard
- Products - Manage your inventory
- Purchases - Track what you buy from suppliers
- Stock Management - Check and update inventory
- Sales - Record customer purchases
- Expenses - Track business costs
- Payment Accounts - Manage money and payments
- Contacts - Customer and supplier information
- User Management - Add or change system users
- Reports - See detailed business information
- Notification Templates - Set up automatic messages
- Settings - Change how the system works
2. Top Section - Welcome and Quick Actions
At the top of the screen you'll see:
- Welcome message with your name (e.g., "Welcome Admin")
- Quick action buttons like "POS" or "Today's Profit"
- Your business name in the top left corner
3. Summary Boxes
The colorful boxes at the top show important numbers:
- Total Sales - How much you've sold (shown in currency)
- Total Purchase - How much stock you've bought
- Purchase Due - Money you still need to pay suppliers
- Total Purchase Return - Items returned to suppliers
- Total Sales Return - Items customers returned to you
- Expense - Money spent on running the business
4. Stock Information
In the middle section, you'll see:
- Product Stock Alert - Items that are running low
- A table showing your inventory with columns for:
- Product name
- Location
- Quantity
- Current stock
- Stock Expiry Alert - Items that will expire soon
5. Sales Charts
At the bottom of the screen, you'll see charts that show:
- Sales Last 30 Days - How your sales have been doing recently
- Sales Current Financial Year - How your sales are doing this year
6. Payment Information
Below the charts, you'll see sections about payments:
- Sales Payment Due - Money customers still owe you
- Purchase Payment Due - Money you still owe suppliers
Tip: Anything highlighted in yellow or red (like "Product Stock Alert") needs your attention right away. These are warnings about things you should check.
Making Sales
This is what you'll do most often - ringing up customers and taking their payments.
How to Ring Up a Sale
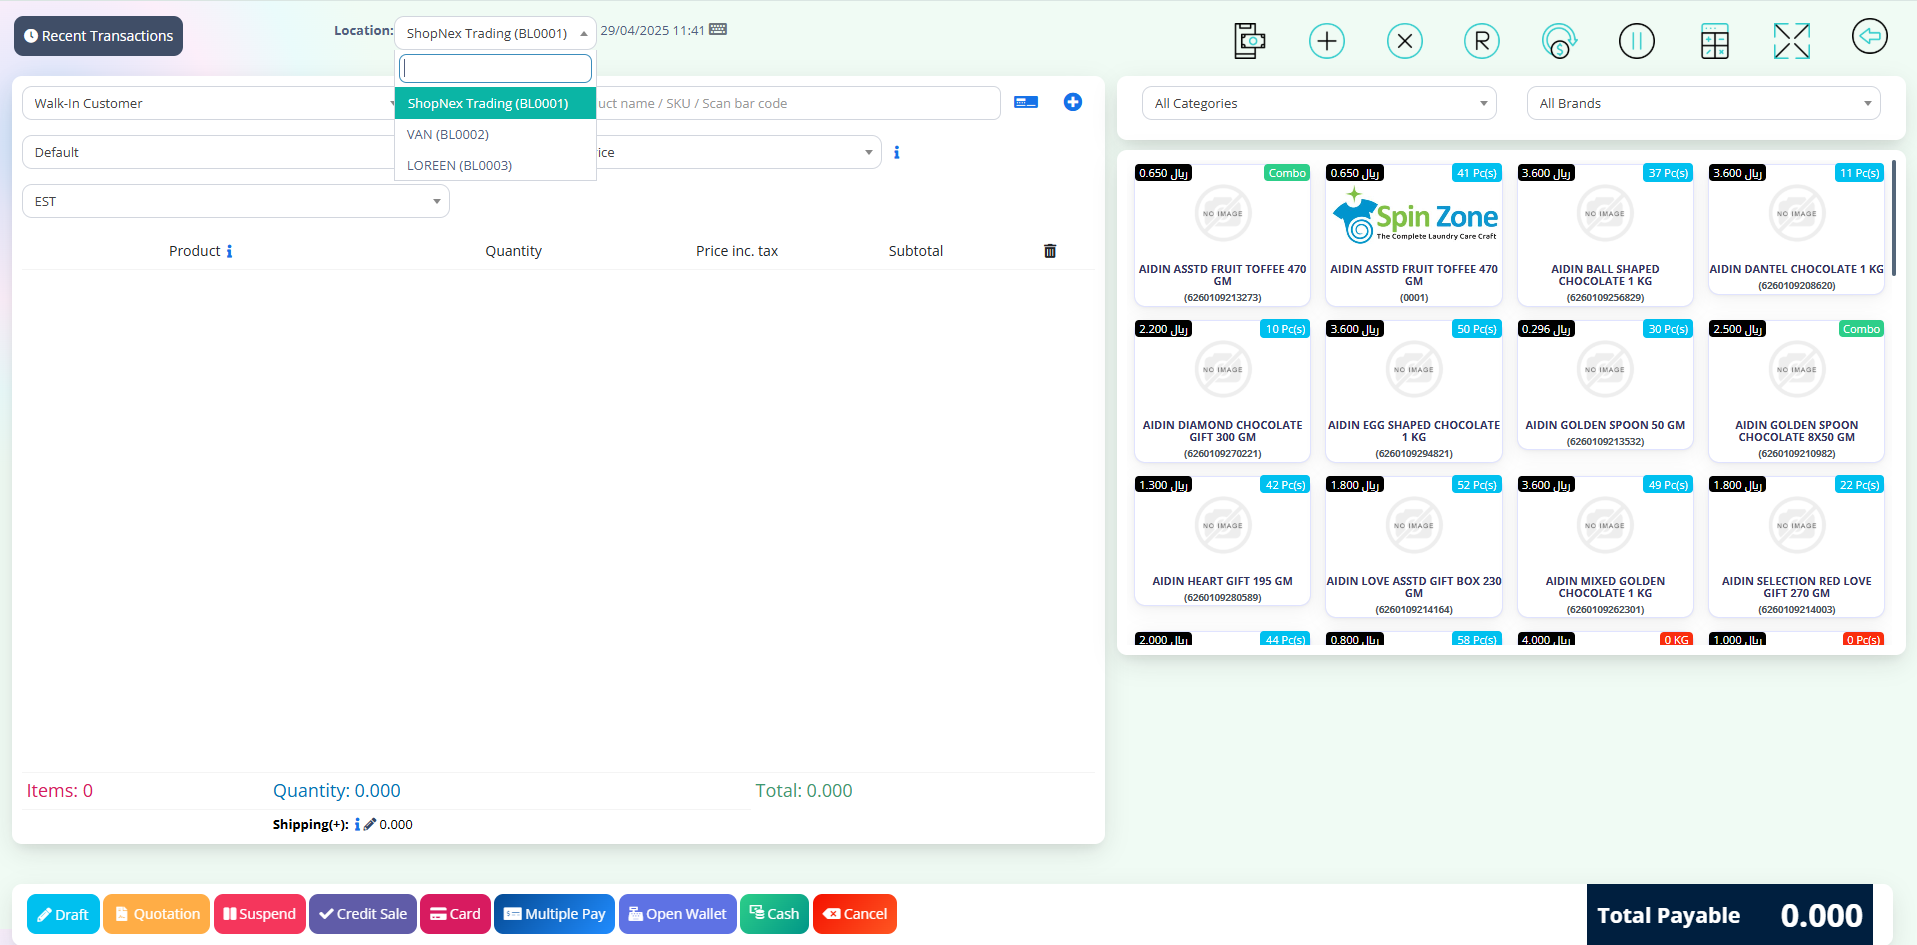
The sales screen where you add items and take payment
When a customer wants to buy something:
- Click on "POS" in the header menu (Top right of the screen)
- Add products by:
- Scanning the barcode if you have a scanner
- OR typing the product name in the search box
- OR browsing through categories to find the product
- To change quantity, click the + or - buttons, or type the number
- To give a discount, click on the item and then the "Discount" button
- If you want to record customer information, click "Add Customer"
- When everything is added, click the "Payment" (Cash / Multiple Pay / Card / Credit Sale) button

Remove product from Sale Screen
Tip: If you make a mistake, you can click the trash (red color) button next to an item to remove it.
Taking Payment
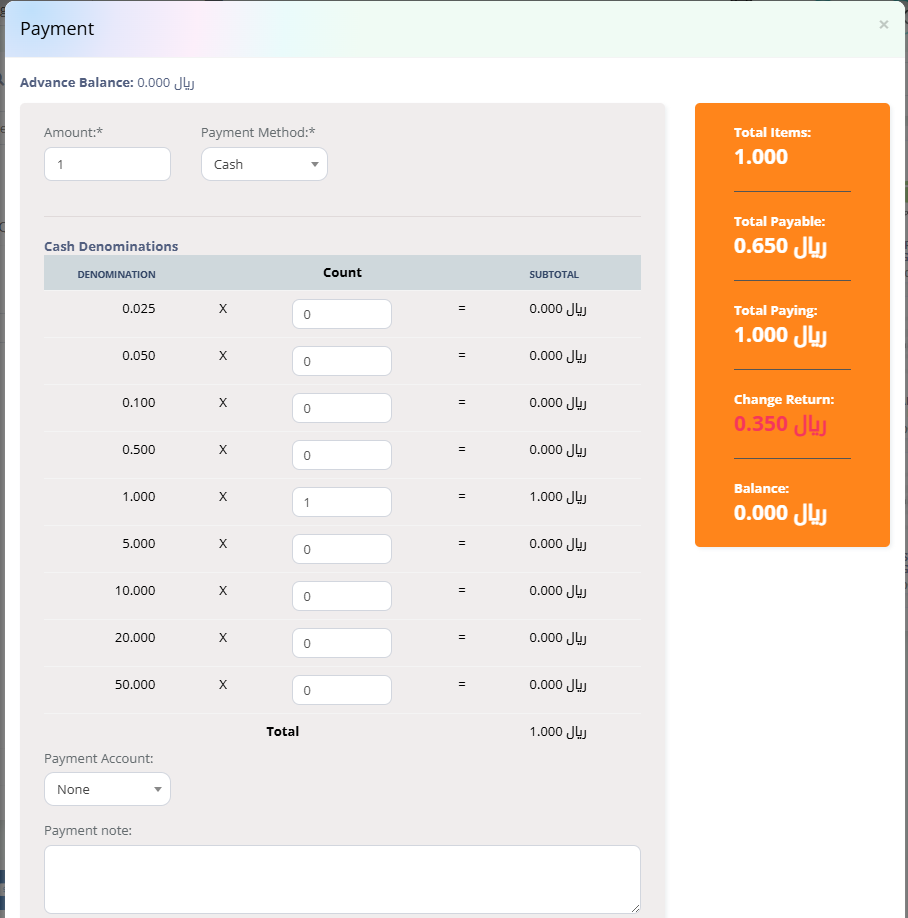
The payment screen where you complete the transaction
To finish the sale and take payment:
- Choose how the customer is paying:
- Cash
- Credit/Debit Card
- Mobile Payment
- Or other options that appear on your screen
- For Multiple payments:
- Enter how much cash the customer gave you
- The system will tell you how much change to give back
- Click "Finalize Payment"
- Choose whether to print a receipt or send by email

Print popup - User can customize the invoice template
When a Customer Wants a Refund

The refund screen helps you process returns
To give a customer a refund:
- Click on "Sales" in the left menu
- Click on "Sales History"
- Find the original sale by:
- Looking up the receipt number (easiest if customer has receipt)
- OR searching for the customer's name or phone number
- OR looking through recent sales by date
- Click on the sale you found
- Click the "Refund" button
- Check the boxes next to items being returned
- Choose a reason for the refund (helps with tracking)
- Click "Process Refund"
Remember: You might need your manager to approve refunds. Ask for help if the system doesn't let you complete a refund.
Getting Started: Adding Your Products
When you first start using the system, you'll need to add your products. You can add them one by one, or import many at once.
Understanding the Product List
Before adding products, let's understand what you're seeing in the product list table:
- Product: The name of each item you sell
- Location: Where the item is stored (e.g., LOREN, VAN)
- Current Stock: How many of each item you have
- Unit: How the item is measured (e.g., Pasti, Kg)
Note: The product table shows you important information like low stock warnings (highlighted in yellow).
How to Add Products One by One
To add a single new product:
- Click on "Products" in the left menu
- Look for a button that says "Add" or "Add New Product"
- Fill out the product information form with details like:
- Product name
- SKU (product code)
- Category
- Price
- Cost
- Quantity
- Click "Save" or "Add Product" to finish
How to Import Many Products at Once
The Import Products screen where you can upload a file with multiple products
If you have many products to add, you can import them all at once:
- Click on "Products" in the left menu
- Look for "Import Products" in the menu or submenu
- Click on "Import Products"
- You'll see the "File To Import" section with a "Browse..." button
- Click "Browse..." to select your product file from your computer
- Once you've selected your file, click the green "Submit" button
Understanding the Import Products Template
The system shows you exactly what information to include in your import file:
- Column 1: Product Name (Required) - The name of your product
- Column 2: Brand (Optional) - The brand name
- Column 3: Unit (Required) - How the product is measured (piece, kg, etc.)
- Column 4: Category (Optional) - Product category
- Column 5: Sub-category (Optional) - More specific category
- Column 6: SKU (Optional) - Product code
- Column 7: Barcode Type (Optional) - Format of barcode (C128, EAN, etc.)
- Column 8: Manage Stock (Required) - Yes or No
- Column 9: Alert quantity (Optional) - When to warn about low stock
- Column 10: Expires in (Optional) - Product shelf life
- Column 11: Expiry Period Unit (Optional) - Days or months
- Column 12: Applicable Tax (Optional) - Tax rate name
- Column 13: Selling Price Tax Type (Required) - Inclusive or exclusive
- Column 14: Product Type (Required) - Single or variable
- Column 15-18: Variation details - For products with options (size, color, etc.)
- Column 19-36: Pricing, stock, and other details
Important: Make sure your import file has the correct format. All required fields (marked "Required") must be filled out. Double-check your information before importing to avoid mistakes.
Tips for Product Import
- You can create an Excel or CSV file with all your product information
- Follow the exact order of columns shown in the instructions
- For variable products (like different sizes), use the variation columns
- If you don't have a SKU, the system can generate one automatically
- Make sure your barcode type matches what's on your products (C128, EAN-13, etc.)
Checking Your Products After Import
After adding products, check that everything imported correctly:
- Look at the product list on your dashboard or in the Products section
- Make sure the quantities and prices are correct
- Check that products are assigned to the right categories
- Fix any errors by clicking on the product name and editing it
Tip: If you see a "Product Stock Alert" warning after importing, it means some products have low stock levels and might need to be reordered soon.
Adding Your Customers and Suppliers
You can add your customers and suppliers to the system to keep track of your business relationships.
The Import Contacts screen where you can upload a file with customer and supplier information
How to Import Contacts
If you already have a list of your customers and suppliers, you can import them all at once:
- Click on "Contacts" in the left menu
- Click on "Import Contacts" in the submenu
- You'll see the "File To Import" section with a "Browse..." button
- Click "Browse..." to select your contact file from your computer
- Once you've selected your file, click the green "Submit" button
Understanding the Contact Import Template
The system shows you exactly what information to include in your import file:
- Column 1: Contact type (Required) - Choose from:
- 1 = Customer
- 2 = Supplier
- 3 = Both
- Column 2: Prefix (Optional) - Mr., Mrs., Ms., etc.
- Column 3: First Name (Required)
- Column 4: Middle name (Optional)
- Column 5: Last Name (Optional)
- Column 6: Business Name (Required if contact type is supplier or both)
- Column 7: Contact ID (Optional) - System can generate this automatically
- Column 8: Tax number (Optional)
- Column 9: Opening balance (Optional)
- Column 10: Pay term (Required if contact type is supplier or both)
- Column 11: Pay term period (Required if contact type is supplier or both) - Days or months
- Column 12: Credit Limit (Optional)
- Column 13: Email (Optional)
- Column 14: Mobile (Required)
- Column 15-25: Additional contact information - Landline, address, etc.
- Column 26+: Custom fields (Optional)
Tips for Contact Import
- You can create an Excel or CSV file with all your contact information
- Follow the exact order of columns shown in the instructions
- Make sure to mark each contact as customer, supplier, or both (column 1)
- For suppliers, you must include business name and payment terms
- For dates like birth date, use the format Y-m-d (2023-04-29)
Important: Make sure your import file has the correct format. All required fields (marked "Required") must be filled out. Double-check your information before importing to avoid mistakes.
Adding Contacts One by One
If you only have a few contacts or want to add them as you go:
- Click on "Contacts" in the left menu
- Choose "Customers" or "Suppliers" depending on who you want to add
- Look for a button that says "Add" or "Add New"
- Fill out the contact information form
- Click "Save" to finish
Finding and Managing Your Contacts
Once you've added contacts, you can:
- Click on "Contacts" > "Customers" to see all your customers
- Click on "Contacts" > "Suppliers" to see all your suppliers
- Use the search box to find specific contacts
- Click on a contact's name to see their details or edit their information
- See a contact's purchase history or payment history
Tip: Having your contacts in the system makes it faster to create sales and purchase orders because you can just select their name instead of typing all their information each time.
Working with Customers
Keeping track of your customers helps you provide better service.
Adding a New Customer
The screen for adding customer information
To add a new customer to your system:
- Click "Customers" in the left menu
- Click "Add New Customer"
- Fill in their information:
- Name: Customer's full name
- Phone: Their contact number
- Email: Their email address (for receipts and promotions)
- Address: Where they live (if needed)
- Notes: Any special information about this customer
- Click "Save" or "Add Customer"
Finding a Customer
The screen for searching and viewing customer information
To look up information about a customer:
- Click "Customers" in the left menu
- Use the search box to type their:
- Name
- Phone number
- Email address
- Click on their name in the results to see their full details
- From their profile, you can:
- See their purchase history
- Update their information
- Add notes about the customer
Reports: Understanding Your Business
Reports help you see how your business is doing and make good decisions.
Sales Reports
The sales report screen shows how much you've sold
To see your sales information:
- Click "Reports" in the left menu
- Click "Sales Reports"
- Choose what time period you want to see:
- Today
- This Week
- This Month
- Custom Dates (if you want to pick specific dates)
- The report will show:
- Total sales amount
- Number of transactions
- Average sale value
- Best-selling products
- Sales by time of day
- If you want to save the report, click "Export" or "Download"
Inventory Reports
The inventory report shows what's in stock and what's running low
To check on your inventory:
- Click "Reports" in the left menu
- Click "Inventory Reports"
- You can see:
- Current stock levels for all products
- Items that are low in stock (need to reorder)
- Items that aren't selling well
- Value of your current inventory
- Click on any product to see more details about it
Common Daily Tasks
Here are step-by-step guides for things you'll do regularly.
Starting Your Day
The screen for starting your business day
When you first arrive for work:
- Turn on your computer and log in to the POS system
- Click on "Register" or "Cash Management" (might be under settings)
- Click "Open Register" or "Start Day"
- Count the cash in your drawer
- Enter the starting amount of cash
- Click "Confirm" or "Start"
Ending Your Day
The screen for closing out at the end of the day
At the end of your business day:
- Click on "Register" or "Cash Management"
- Click "Close Register" or "End Day"
- Count all the cash in your drawer
- Enter the ending amount of cash
- The system will show if your drawer is balanced (matches what it should be)
- Enter any notes about discrepancies
- Click "Confirm" or "Close"
- Print or save the end-of-day report if needed
Common Questions & Answers
Q: What if I make a mistake while entering a sale?
A: If you haven't completed the sale yet, you can remove items by clicking the X button next to them. If you've already completed the sale, talk to your manager about processing a return and creating a new sale.
Q: What if the barcode scanner isn't working?
A: You can type the product name or barcode number in the search box. Make sure the scanner is connected properly, and try cleaning the scanner window with a soft cloth.
Q: What if I forget my password?
A: Click on the "Forgot Password" link on the login page. Enter your username or email address, and follow the instructions sent to your email to reset your password.
Q: What if the system crashes or freezes?
A: First, try refreshing the page. If that doesn't work, close the browser and open it again. If problems continue, contact your manager or technical support.
Q: How do I find a sale from earlier today or yesterday?
A: Click on "Sales" in the left menu, then "Sales History." You can search by date, receipt number, or customer name to find the sale.
Q: A customer can't remember what they bought but wants a copy of their receipt. How can I help?
A: Ask for their name or phone number, then search for them in the Customers section. Looking at their purchase history, you can find their recent sales and print a new receipt.